
Welcome to our comprehensive guide on Kubernetes Helm, a powerful tool for managing applications on Kubernetes clusters. In this tutorial, we will explore the ins and outs of Helm, from installation to deployment, to help you streamline your container orchestration process.
Introduction to Helm
Helm is a package manager for Kubernetes, created by the Cloud Native Computing Foundation. It simplifies the deployment of applications on Kubernetes by grouping all resources into a single package, known as a chart. This allows for easy sharing and reusability of configurations.
Using Helm, you can manage your Kubernetes deployments more efficiently by templating your configurations using YAML files. Helm also provides a rollback feature, allowing you to easily revert changes if needed. It’s a valuable tool for DevOps teams working with Kubernetes applications.
By creating charts with Helm, you can abstract away the complexity of your Kubernetes configurations and make your deployments more manageable. Whether you’re deploying microservices or a database like MySQL, Helm can streamline the process and improve your workflow.
Understanding Helm Chart Structure
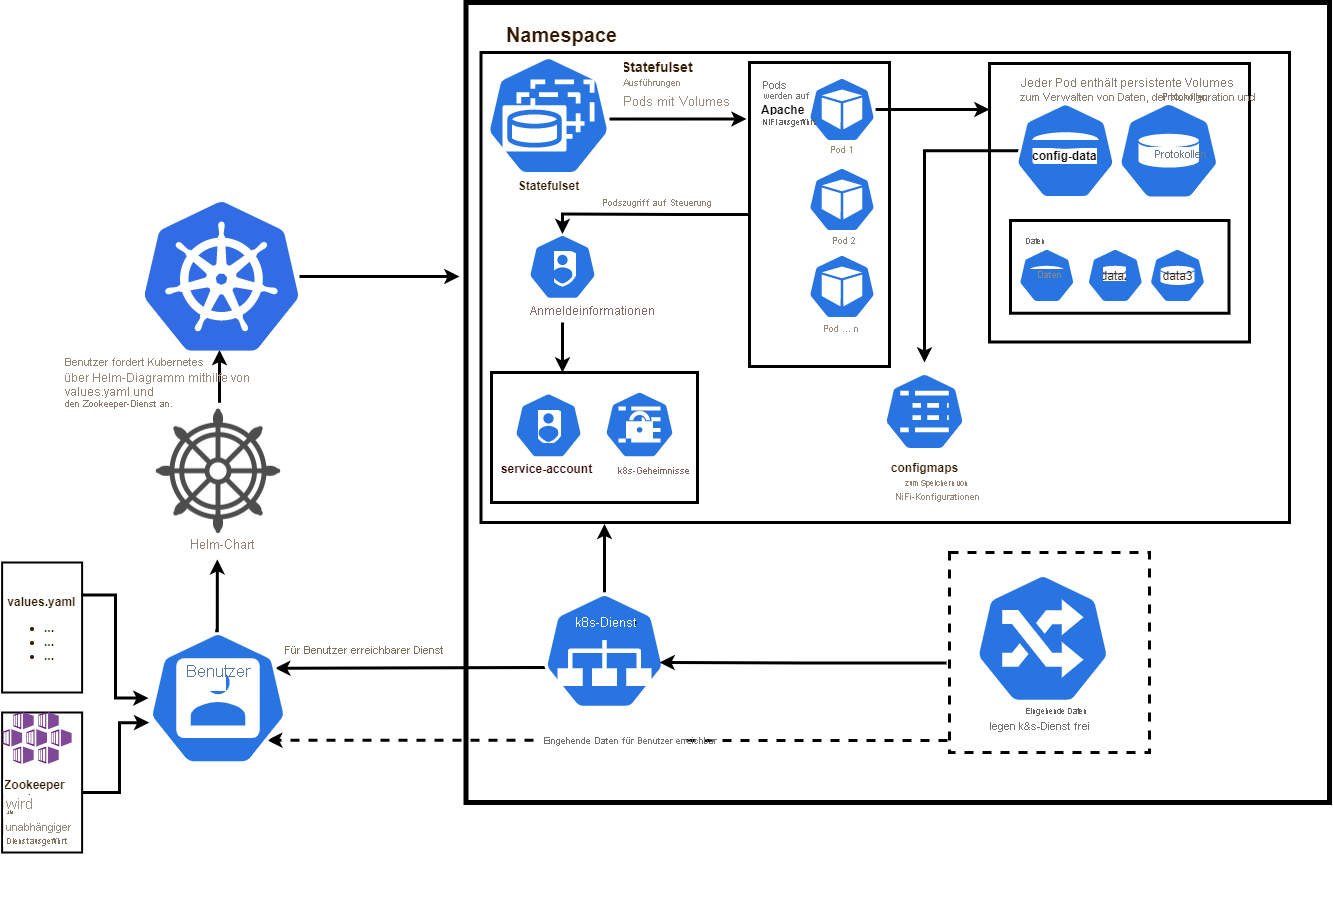
When working with Helm charts in Kubernetes, it is essential to understand the structure of these packages. A Helm chart is a collection of files that describes a set of Kubernetes resources. The main components of a Helm chart include the Chart.yaml file, which contains metadata about the chart, and the values.yaml file, which defines customizable parameters for the chart.
Another important file in a Helm chart is the templates directory, which contains **YAML** files that define the Kubernetes resources to be deployed. Each template file can include placeholders for values defined in the values.yaml file, allowing for easy customization of the resources.
Helm charts also often include a README.md file, which provides instructions on how to use the chart and any dependencies it may have. Understanding the structure of a Helm chart is crucial for effectively managing and deploying applications in a Kubernetes environment.
By familiarizing yourself with the components of a Helm chart, you can streamline the deployment process and ensure that your applications are running smoothly in your Kubernetes cluster.
Creating a Helm Chart from Scratch
To create a Helm Chart from scratch, you need to start by defining the structure of your application within the chart. This includes creating a Chart.yaml file to specify metadata such as the name, version, and description of the chart. Next, you will need to set up the directory structure for your chart, including templates for Kubernetes resources like deployments and services.
Once the basic structure is in place, you can start populating the templates with the necessary configurations for your application. This may involve defining environment variables, specifying resource limits, and setting up any necessary dependencies. Helm allows you to easily parameterize your configurations, making it simple to reuse the same chart with different values.
After you have defined all the necessary configurations, you can package your chart using the helm package command. This will create a .tgz file that can be easily shared and installed on any Kubernetes cluster. Helm also provides functionalities for versioning and managing releases, allowing for easy rollback if needed.
Customizing Helm Chart Templates
When customizing **Helm Chart templates**, you have the flexibility to tailor your Kubernetes deployments to fit your specific needs. This can involve modifying values in the Chart.yaml file, adjusting configurations in the values.yaml file, or even creating your own templates.
To customize Helm Chart templates effectively, it’s essential to understand the structure of the Chart and how each component interacts with the Kubernetes environment. By leveraging Helm’s templating language, you can dynamically generate Kubernetes manifests based on your input values.
Additionally, you can take advantage of Helm’s release management capabilities to easily rollback changes, manage different environments, and promote reusability across your deployments. This level of customization empowers **DevOps** teams to efficiently manage complex **microservices** infrastructures with ease.
Installing, Upgrading, and Rolling Back Helm Releases
To install a Helm chart, use the helm install command followed by the chart name and any necessary values. Upgrading a release is done with helm upgrade, while rolling back to a previous state can be achieved using helm rollback.
When installing or upgrading Helm releases, always consider the values you pass to customize the deployment. Helm charts often come with default values, but you can override them as needed for your specific environment.
To roll back a release, specify the release name and the revision number you want to revert to. Helm will then handle the rollback process and revert your deployment to the desired state.
Understanding how to effectively manage Helm releases is crucial for maintaining a stable and efficient Kubernetes environment. Mastering these commands will give you the ability to confidently deploy, upgrade, and roll back your applications with ease.
Validating and Deploying Helm Charts
To **validate** and **deploy** Helm Charts, you first need to ensure that the charts are error-free and ready to be used in your Kubernetes environment. This involves running commands such as `helm lint` to check for any issues in the chart. Once validated, you can then proceed with deploying the Helm charts using `helm install`. This will install the necessary resources onto your Kubernetes cluster.
Before deploying the Helm charts, it’s important to understand the various configuration options available to customize the deployment. You can provide values through a `values.yaml` file or directly through the command line. This flexibility allows you to tailor the deployment to your specific requirements.
After deploying the Helm charts, you can verify that the resources are running correctly in your Kubernetes cluster. You can use commands such as `kubectl get pods` to check the status of the pods created by the Helm deployment. Additionally, you can access the services exposed by the deployment to ensure that they are functioning as expected.
Uninstalling Helm Releases
To uninstall **Helm Releases**, you can use the `helm uninstall` command followed by the release name. This will remove the specified release from your Kubernetes cluster. If you want to delete all releases, you can run `helm uninstall –all`.
Before uninstalling a release, make sure to check if there are any dependencies that need to be uninstalled first. You can do this by running `helm dependency list` for the release.
Keep in mind that uninstalling a release will not delete any persistent volumes associated with the release. You will need to manually delete these if you no longer need them.
After uninstalling a release, you can verify that it has been removed by running `helm list` or `helm ls –all`. This will show you a list of all releases in your cluster.
Reusing Existing Helm Charts
To reuse existing Helm charts, you can search for them in repositories like the official Helm Hub or create your own private repository. By customizing values in the values.yaml file, you can tailor the deployment to your specific needs without starting from scratch. This allows for easy parameterization and flexibility when deploying applications.
Additionally, Helm supports versioning and rollback capabilities, enabling you to track changes and revert to previous configurations if needed.
Prerequisites for Using Helm
Before diving into using Helm for Kubernetes, it’s essential to have a solid foundation in Linux and Docker. Familiarity with software repositories and package managers like APT or Yum will also be beneficial.
Understanding how manifest files work and being comfortable with source code will make working with Helm much easier. Knowledge of environment variables and communication protocols is also crucial for successful Helm deployments.
Having experience with cloud computing and database management will be advantageous when working with Helm in a production environment. Make sure to have a good grasp of Cloud-Native concepts and infrastructure complexities.
Debugging Helm Charts

When debugging **Helm Charts**, start by checking the syntax of your YAML files. Ensure that the values are properly formatted and that there are no typos or missing brackets causing errors.
Next, use the **Helm lint** command to catch any potential issues with your charts before deploying them. This command will provide feedback on potential problems or best practices that may not be followed.
If you encounter errors during deployment, use the **helm status** command to get more information about the status of your release. This can help identify where the issue is occurring and troubleshoot accordingly.
Additionally, check the **Helm release logs** for any error messages that may provide insight into what went wrong during deployment. This can help pinpoint the issue and determine the best course of action to fix it.
Best Practices for Helm Charts
| Practice | Description |
|---|---|
| Use Chart Templates | Utilize the templating engine in Helm to create reusable and customizable chart templates. |
| Version Control | Keep track of Helm chart versions using version control systems like Git to maintain a history of changes. |
| Dependency Management | Manage dependencies in Helm charts efficiently by using the requirements.yaml file and helm dependency command. |
| Parameterization | Parameterize Helm charts to make them more configurable and reusable across different environments. |
| Security Best Practices | Follow security best practices by avoiding hardcoding sensitive information in Helm charts and using secrets for sensitive data. |


