In this beginner-friendly Docker tutorial, we will explore the basics of containerization and how to get started with Docker.
Introduction to Docker
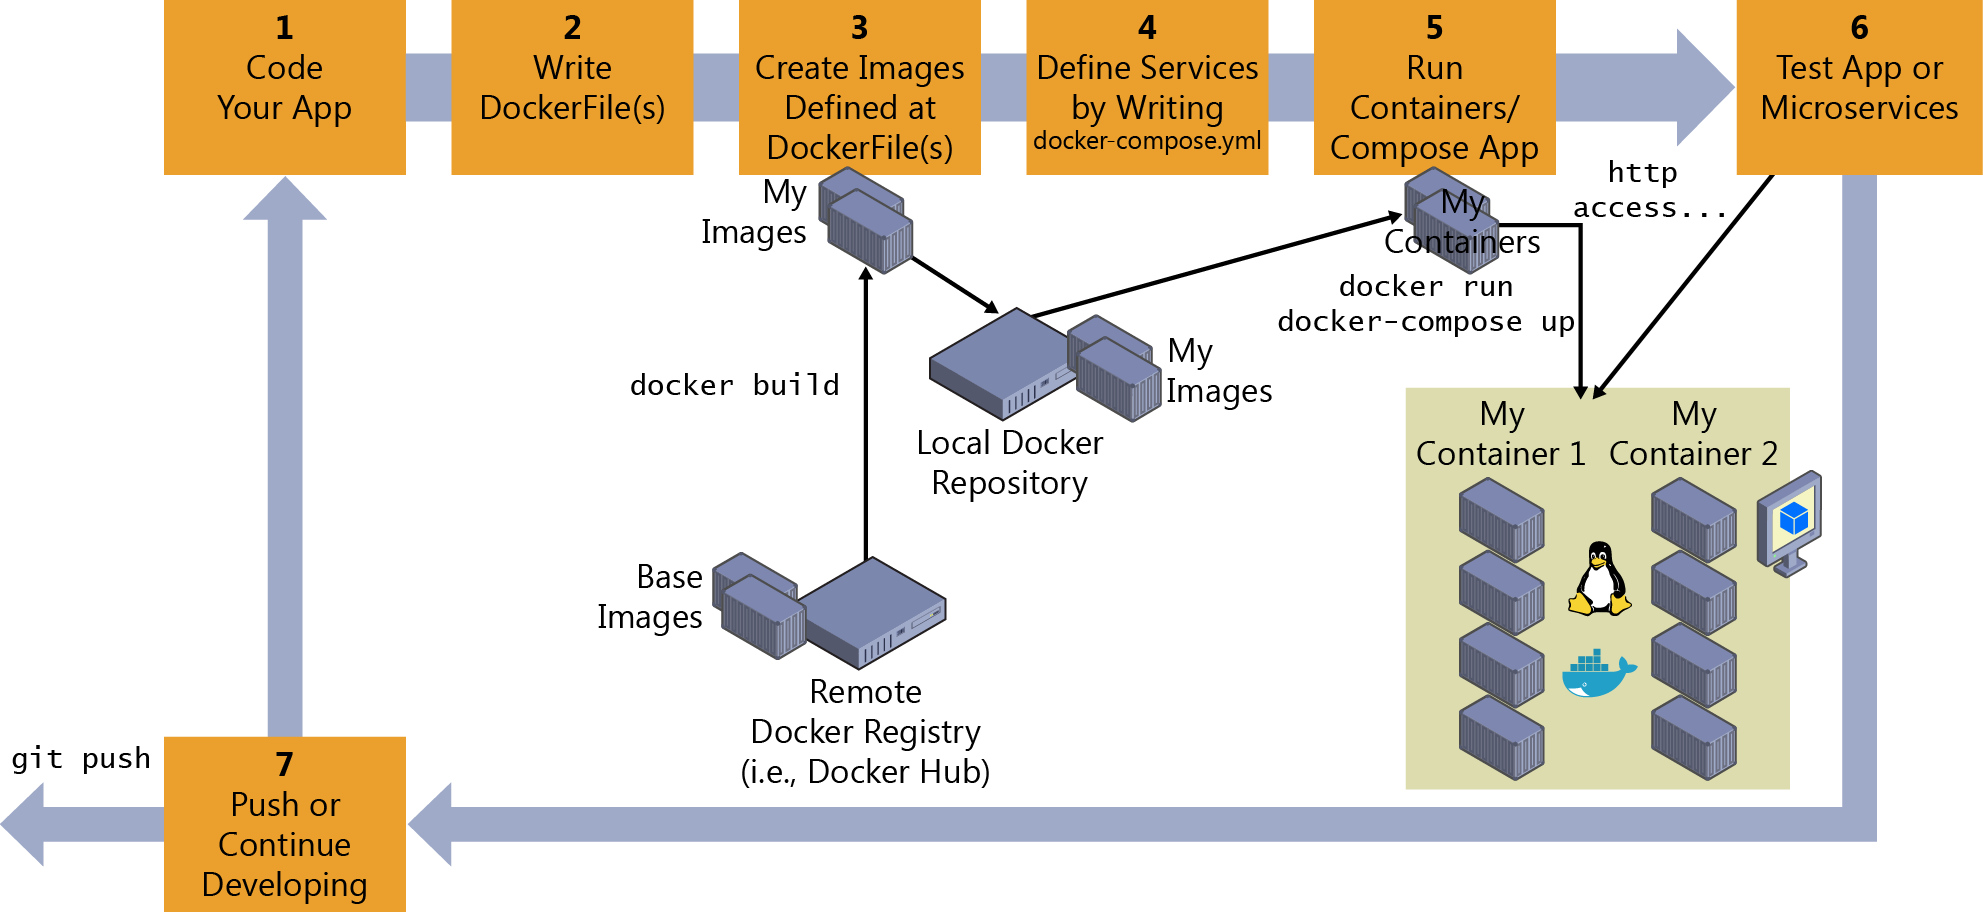
Docker is a powerful tool that allows you to **create**, **deploy**, and **run** applications using **containers**. These containers are lightweight, portable, and isolated environments that contain everything needed to run your application. With Docker, you can easily package your application and its dependencies into a single unit that can be **deployed** anywhere.
Using Docker, you can **increase** **efficiency** by **streamlining** the process of **building** and **deploying** applications. This is especially useful in **cloud computing** environments where resources are **scarce**. Docker uses **OS-level virtualization** to **run** multiple containers on a **single** **host** **operating** **system**, which **reduces** the overhead of **hardware** **virtualization**.
One of the key benefits of Docker is its **portability**. You can **develop** and **test** your application on your **laptop** and then **deploy** it to a **data** **center** without any changes. Docker also **simplifies** the **process** of **packaging** and **labeling** applications, making it easier to **manage** and **distribute** software.
By **learning** Docker, you can **automate** the **deployment** process, **improve** **software** **portability**, and **increase** **efficiency** in your **development** workflow. Whether you are **building** a **web** **application**, **mobile** **app**, or **enterprise** **software**, Docker can help **streamline** the **process** and **improve** **computing** **performance**.
Setting Up Docker on Your Computer
To set up Docker on your computer, you first need to install the Docker software. You can find installation instructions on the official Docker website. Once Docker is installed, you will need to start the Docker service on your computer. This can usually be done through the command line using a command like `sudo systemctl start docker` on Linux.
After starting the Docker service, you can verify that Docker is running by running a simple command like `docker –version`. If Docker is running correctly, you should see the version number displayed in the output. With Docker up and running on your computer, you can start creating and running Docker containers to package and run your applications in isolated environments.
Building Your First Container
To build your first container using Docker, start by creating a Dockerfile in your project directory. This file contains instructions for Docker to build your container image. Use a base image that suits your application, such as Ubuntu or Alpine Linux.
Next, add commands to the Dockerfile to install any dependencies your application needs. This could include packages, libraries, or software tools. Use the RUN instruction to execute these commands during the container build process.
After setting up the environment, copy your application code into the container using the COPY instruction. This ensures that your code is included in the container image and can be executed when the container is run.
Finally, use the CMD instruction to define the command that should be run when the container starts. This could be the entry point for your application or a script that kicks off a specific process.
Once your Dockerfile is ready, build the container image using the docker build command. This will create a new image based on your instructions. You can then run the container using the docker run command and test that your application works as expected.
Building your first container with Docker is a great way to get started with containerization and learn more about how to package and run applications in a portable and efficient manner. Experiment with different base images, dependencies, and commands to customize your container for your specific needs.
Understanding Dockerfile
A **Dockerfile** is a text document that contains all the commands a user could call on the command line to assemble an image. This file can be used to automate the process of creating a Docker image, making it repeatable and efficient.
When creating a Dockerfile, it is essential to understand the **instructions** that can be used, such as `FROM`, `RUN`, `COPY`, `CMD`, and `ENTRYPOINT`. Each instruction serves a specific purpose in the building process and contributes to the final image’s functionality.
It is important to structure the Dockerfile properly, starting with the `FROM` instruction to specify the base image and then proceeding with other instructions in a logical order. This ensures that the image is built correctly and efficiently.
By mastering the use of Dockerfiles, users can create customized images that suit their specific needs and requirements. This knowledge is crucial for anyone looking to leverage the power of Docker for efficient containerization of applications.
Docker Compose Basics
Docker Compose is a tool provided by Docker that lets you define and run multi-container Docker applications. It uses a YAML file to configure your application’s services, networks, and volumes.
This makes it easy to manage your containers as a single unit, allowing you to quickly spin up your entire application environment with a single command.
To get started with Docker Compose, you’ll need to have Docker installed on your system. Once you have Docker installed, you can create a `docker-compose.yml` file in your project directory to define your services.
In this file, you can specify the services you want to run, the networks they should be part of, and any volumes they need to share data. Start your services using the `docker-compose up` command and stop them using `docker-compose down`.
Docker Compose simplifies the process of managing complex applications by abstracting away the details of individual containers and allowing you to focus on the overall structure of your application.
By using Docker Compose, you can easily automate the deployment and scaling of your applications, making it an essential tool for anyone working with containers.
Networking in Docker
When it comes to networking in **Docker**, there are a few key concepts to keep in mind. One important aspect is creating **networks** to allow **containers** to communicate with each other. This can be done using the Docker **CLI** or by using **Docker Compose** to define the **network** configuration in a **YAML file**.
Another important consideration is **port mapping**, which allows external **networks** to access **services** running inside the **containers**. This can be achieved by specifying the **port** mapping in the **Docker run** command or using the **ports** directive in the **Docker Compose** file.
It is also crucial to understand **DNS resolution** in **Docker**, which allows **containers** to communicate with each other using their **container names**. By default, **Docker** automatically sets up a **DNS server** for this purpose, making it easier to reference other **containers** within the same **network**.
By mastering these key concepts, you will be able to efficiently manage **networking** in **Docker** and ensure seamless communication between **containers**. This is essential for building **microservices** architectures, **web applications**, and various other **software** projects in a **containerized** environment.
Useful Docker Commands
| Command | Description |
|---|---|
| docker run [OPTIONS] IMAGE [COMMAND] [ARG…] | Run a container from a Docker image |
| docker ps | List running containers |
| docker ps -a | List all containers, including stopped ones |
| docker images | List all Docker images |
| docker build [OPTIONS] PATH | Build an image from a Dockerfile |
| docker stop CONTAINER | Stop a running container |
| docker rm CONTAINER | Remove a container |
| docker rmi IMAGE | Remove an image |
Next Steps and Conclusion
Next Steps: Now that you have a basic understanding of Docker, it’s time to take your skills to the next level. Consider enrolling in a Linux training course to deepen your knowledge and expertise in this field. Look for courses that cover topics such as cloud computing, OS-level virtualization, and Docker software.
Conclusion: Docker is a powerful tool that can streamline your development process and improve application portability. By mastering Docker, you can enhance your skills in automation, software development, and more. Keep practicing and exploring different use cases to fully leverage the benefits of Docker in your projects. Good luck on your Docker journey!