In this guide, we will explore the process of building the Linux kernel source code from scratch.
Setting Up Build Environment
To set up the build environment for compiling the Linux kernel source code, first, ensure that you have all the necessary packages installed on your system. Use the package manager of your Linux distribution, such as APT for Debian-based systems or Wget for downloading packages.
Next, download the Linux kernel source code either from the official website or using Git. Extract the source code using Tar or XZ Utils and navigate to the directory in your terminal.
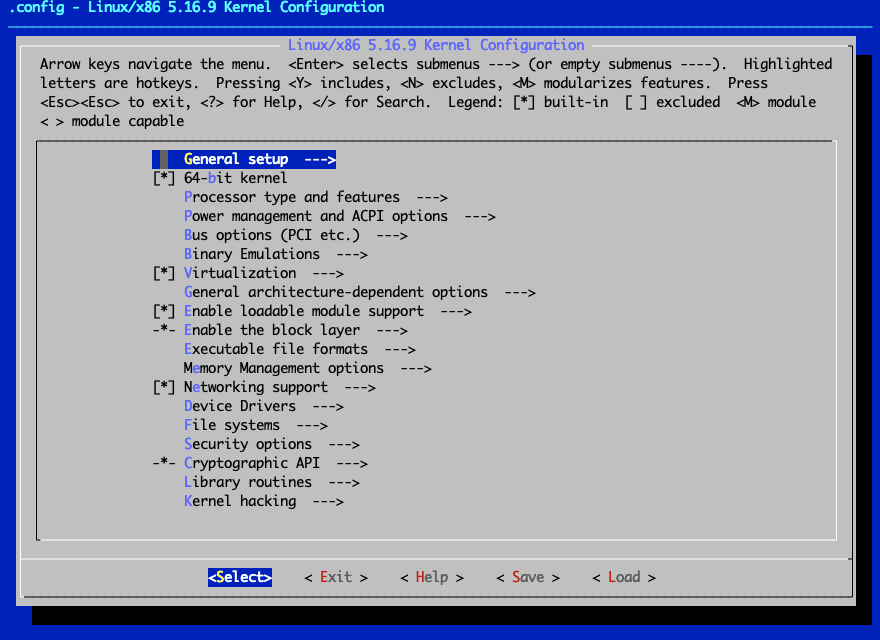
Run the make menuconfig command to configure the kernel build options. You can customize various settings, such as device drivers, file systems, and kernel features, using a text-based user interface.
Before compiling the kernel, make sure to set any required environment variables and apply any necessary patches. This ensures that the kernel is built correctly for your system.
Once you have configured everything, run the make command to compile the kernel. This process may take some time depending on your system’s specifications.
After the compilation is complete, you can install the new kernel image and initramfs files. Configure your bootloader, such as GNU GRUB, to boot from the new kernel image.
Obtaining and Verifying the Source Code
To obtain and verify the source code for building the Linux kernel, you can use Git to clone the repository from kernel.org. Use the following command in your terminal: git clone https://github.com/torvalds/linux.git.
After cloning the repository, switch to the desired kernel version using the git checkout command followed by the version number.
To verify the authenticity of the source code, you can use the PGP signatures provided by Linus Torvalds. You can import his public key and verify the signatures using the gpg –verify command.
It’s crucial to ensure that the source code you are using is from a trusted and reliable source to avoid any security risks or vulnerabilities in the kernel.
Verifying the source code helps in guaranteeing that the code you are building and using is authentic and has not been tampered with in any way. This step is essential for maintaining the integrity of the Linux kernel.
Configuring the Kernel
– To configure the kernel after downloading the Linux kernel source, navigate to the source directory using the command line interface.
– Run the command “make menuconfig” to open the configuration menu, where you can customize various kernel settings.
– Use the arrow keys to navigate through the menu, make your desired changes, and save the configuration before exiting.
– Once the kernel is configured to your specifications, compile it using the “make” command to generate the necessary files.
– Install the newly compiled kernel using your distribution’s package manager or by manually installing the generated files.
– It is crucial to carefully configure the kernel to ensure optimal performance and compatibility with your system’s hardware.
– Keep in mind that configuring the kernel requires a good understanding of your system’s requirements and the Linux environment.
– After configuring and compiling the kernel, you can boot into it using a boot loader like GRUB and start enjoying the benefits of a custom-built kernel.
– Remember to back up your existing kernel and configuration files before making any changes to avoid any potential issues.
– For more detailed instructions on configuring the kernel, refer to the Linux documentation or seek additional training resources.
Building the Kernel
Navigate to the directory where the source code is extracted and configure the Kernel using the make menuconfig command. This allows you to customize the Kernel options based on your requirements. Once configured, compile the Kernel using the make command.
After compilation, install the Kernel modules using make modules_install and install the Kernel image using make install. Update your bootloader configuration to include the new Kernel, then reboot your system to boot into the newly built Kernel.
Make sure to follow a tutorial or guide to ensure a successful build process. Building the Kernel requires knowledge of the command-line interface and basic understanding of Kernel development. Experiment with different configurations to optimize your Kernel for performance and compatibility with your hardware.
Installing the Kernel
To install the kernel after downloading the source code, first extract the files using the Tar command. Navigate to the extracted directory and configure the kernel with the desired settings using the make menuconfig command.
Once the configuration is complete, compile the kernel by running make -j$(nproc). This command will utilize all available CPU cores for faster compilation. After compilation, install the modules with make modules_install and the kernel with make install.
Update the bootloader configuration file, such as GNU GRUB, to include the newly installed kernel. Reboot the system and choose the new kernel from the bootloader menu to boot into the updated Linux environment.
After successful booting, verify the kernel version using the uname -r command. It is important to keep the kernel up to date for security patches and new features. Consider setting up automatic updates or monitoring the official distribution for new releases.
Testing and Debugging
To test and debug the Linux kernel source code, ensure you have the necessary tools installed on your system. This includes debuggers, compilers, and other development packages.
When testing, focus on functionality, performance, and compatibility with different hardware configurations. Use tools like GDB for debugging and analyzing core dumps for identifying issues.
Make sure to systematically test each component of the kernel, such as device drivers, file systems, and system calls.
Utilize command-line interfaces for compiling, installing, and testing the kernel source code.
Regularly check for updates and patches to keep your kernel up to date and secure.
When debugging, pay attention to error messages, logs, and system behavior to pinpoint the root cause of issues.
Lastly, document your testing and debugging processes for future reference and troubleshooting.
Additional Tips and Resources
| Tip/Resource | Description |
|---|---|
| 1. Use make menuconfig | Use the make menuconfig command to configure the kernel before building it. This command will open a text-based menu where you can select various options for your kernel configuration. |
| 2. Check for dependencies | Make sure you have all the necessary dependencies installed on your system before building the kernel. This includes tools like gcc, make, and libncurses-dev. |
| 3. Clean up old files | Before building the kernel, it’s a good idea to clean up any old files from previous builds. You can do this by running make clean or make mrproper. |
| 4. Use make -j | When running make to build the kernel, you can speed up the process by using the -j flag followed by the number of CPU cores on your system. For example, make -j4 will use 4 CPU cores for building. |
| 5. Kernel documentation | Refer to the Linux kernel documentation for more detailed information on building and configuring the kernel. The documentation can be found in the kernel source tree under the Documentation directory. |